I just realized that I never updated anyone on my education in the Gum BiChromate printing process. Well, let me start by saying “I’m sorry”.
The inspiration to learn this print process got its genesis when I saw some of Peter Liepke’s work in Silvershotz magazine. The colors achieved via this black and white process captured my attention first. Coupled with the soft focus, the photos attained a very dreamlike look, almost as if I was looking through a fogged window into someone’s mind. I didn’t know anything about this process, but I knew I liked what it could produce. Since I don’t have the facilities in my home to set up a dark room, I didn’t think much about it until a few months later.
As part of my learning in Photography II this past semester, I was required to provide an oral presentation on an alternative printing process (i.e. other than what we were doing in class). Gum bichromate immediately came to mind as I read the project list. When I spoke with the instructor, she seemed happy that I was choosing a 19th Century process (and it was something she did extensively while earning her MFA). I was told that she possessed all the chemistry to produce a print and all we needed was time for her to go through one with me if I wanted to produce one myself. I immediately jumped at that chance.
Well, it turns out that chemistry portion of producing a good print isn’t quite as extensive as it is when producing a traditional silver print. To make a traditional silver print, one needs developer, stop bath, fixer, permawash (for fiber prints), and water. To make a gum bichromate print one only needs watercolor pigment, Gum Arabic, a dichromate salt (either potassium or aluminum), and water. Seems pretty simple so far.
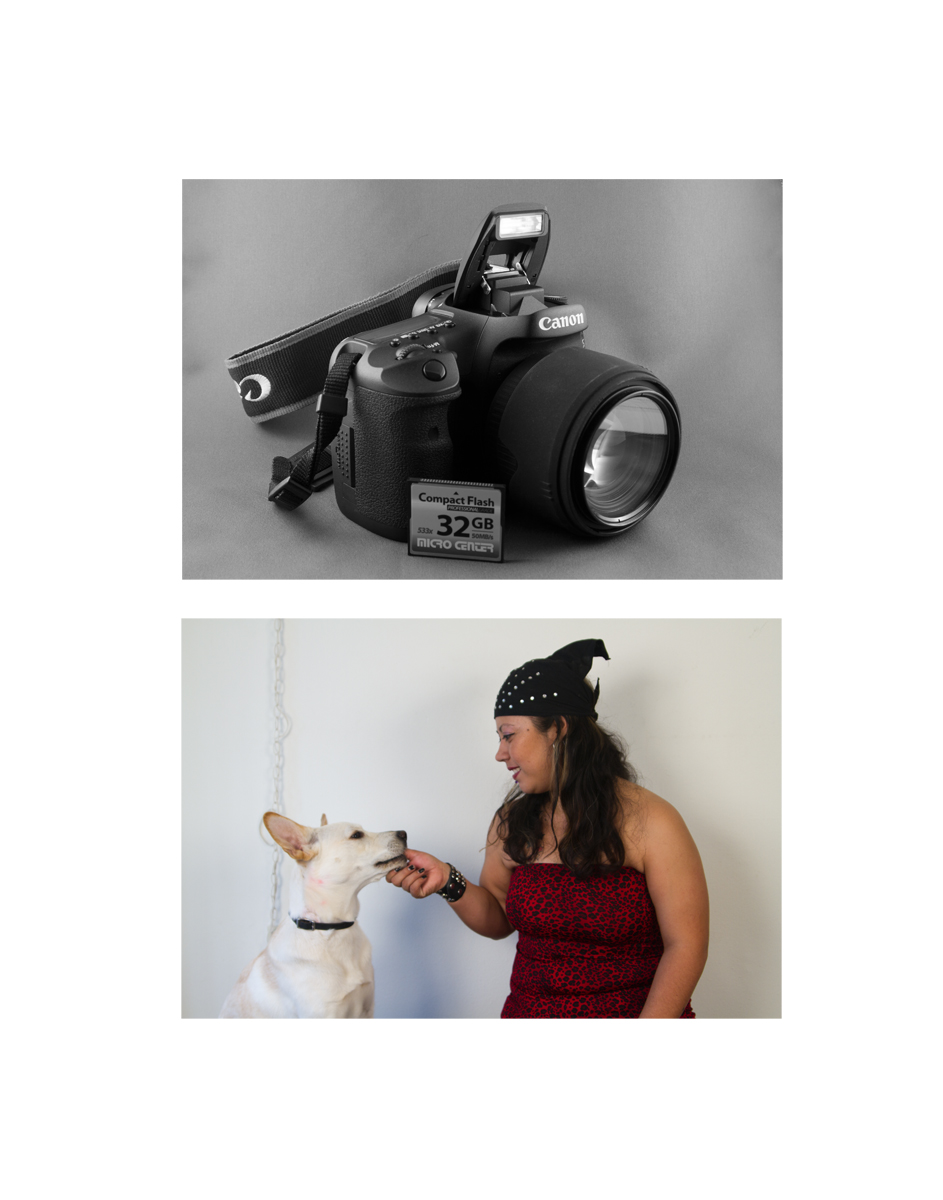
First I had to choose my photograph. For this project I used the following photo:

From this photo I produced 3 negatives printed on acetate. One was a black and white negative and the others were negatives that filtered out the red and green colors, since I was going to use those in my print. Since traditional photographic paper is watercolor paper with an emulsion of light sensitive silver salts coating one side, I only needed good quality watercolor paper as the print base. I preshrunk the paper (in order to minimize the paper’s natural tendency to flex when wet and while drying) and began the next step.
Here is where we get into the chemistry. My first order of business was to mix some Gum Arabic with a solution of potassium dichromate. This had to be done in the dark as dichromate salts are light sensitive (the light was dim as I still needed to be able to see what I was doing). After thoroughly mixing the compounds, I coated one side of a test strip and one side of the sheet that would contain the final print. After letting the paper dry again, I took the test strip and negative outside to expose the paper to the sun.
The next step was to develop the test strip. The great thing about this is the only chemical needed is plain water. Dichromate salts become insoluble as they are exposed to light and they harden the gum arabic mixture on the paper. The water washes away the pieces of gum bichromate that can’t stick to the paper (usually in the highlight areas). Once I developed the strip, I was able to mount the full negative on the sheet and repeat the process for print creation.
The first print turned out better than the teacher had expected for someone doing it for the first time. I was pretty proud of myself, but I knew that the process was going to be repeated a couple more times before I could consider the print finished. I had to run another pass for each color filtered negative and I had to make sure they lined up perfectly with the first (known as registering). If the negatives didn’t register perfectly, then I would be left with something not so good. The only difference in the process from the first run was the mixing of pigment in with the Gum Arabic before mixing in the potassium dichromate.
As you can see from the photos below, the negatives did not register perfect as there was some slippage during transport outside.

The dry print after the second layer was added. Here I mixed in the green pigment.

After adding the red pigment. The shadows have gotten deeper, but the negative was not perfectly registered.
The third layer had yet to dry on the second photo, which is why it has a bit of a glossy look.
All in all, it was a fun experience. I still need to fill in some of the shadow areas, which will be done with a graphite pencil here in the next week or two before I can show everyone a final image.
Since this process is not silver based, the expense in terms of money is not high at all. In fact, a 35-pass kit from Photographer’s Formulary runs about $28 and a bottle of dichromate salts (which will last quite a while) runs about $30. The most expensive part of the process will be the time invested in creating a great print. It takes several layers of gum bichromate for the shadow areas to really pop out, which makes exact registration of the negative a must. There are also concerns about the safety of the dichromate salts which must be address. Dichromate salts are not only toxic, they are also known carcinogens. One will not develop cancer right away from the first exposure to these salts, but care must be taken to minimize direct exposure. They are also powerful eye and lung irritants, so care must also be taken when preparing the solution and during mixing. That said, I would recommend at the very least gloves and goggles when handling the salts, solution, and wet gum bichromate mixture. I would also recommend using a sink that isn’t used for any other purpose (such as getting ready for work or doing the dishes).
All in all, this was a fun experience and this knowledge is something I would like to develop. I just need to figure out how to get a sink in my garage at a reasonable price. Feel free to check the links below to see Peter Liepke’s work and the website for Photographer’s Formulary.